nginx php5.3+mysql5.1 redhat6.5 配置记录

nginx php5.3+mysql5.1 redhat6.5 配置记录

同步自:http://www.gejoin.com/2017/12/27/install-php-mysql-nginx-on-redhat6.5-linux-tips.html

一台没有联网但是有安装介质的rhel6.5-x86_64服务器。 计划安装部署上php+mysql 服务。由于有安装介质,光盘上的mysql版本5.1,php 版本5.3.3 ,没办法软件版本老就老了凑合用了。

1.首先挂载上iso光盘

# mount -o loop -t iso9660 /csys/rhel-server-6.5-x86_64-dvd.iso /mnt/vcdrom/

2.安装 php mysql

# cd /mnt/vcdrom/Packages/
# ls -rlt php* mysql*
# rpm -ivh mysql*.rpm --nodeps --force
# rpm -ivh php*.rpm --nodeps --force

3.编译安装nginx nginx 安装没什么说的,源码nginx-1.12.2编译安装。

# ./configure
# make & make install

4.安装一些php依赖包,rhel5.6介质中的包很少的,基本的php-fpm也是没有的。 可以从以下网站获取rpm包:

https://www.rpmfind.net
https://pkgs.org/download
http://rpm.pbone.net/

php-fpm-5.3.3-26.el6.x86_64.rpm
php-mbstring-5.3.3-26.el6.x86_64.rpm
php-mcrypt-5.3.3-5.el6.x86_64.rpm
libmcrypt-2.5.8-9.el6.x86_64.rpm

5.nginx.conf 配置

server {
listen 80;
server_name localhost;
location / {
root html;
index index.html index.htm index.php;
}
error_page 500 502 503 504 /50x.html;
location = /50x.html {
root html;
}

# pass the PHP scripts to FastCGI server listening on 127.0.0.1:9000
location ~ \.php$ {
root html;
fastcgi_pass 127.0.0.1:9000;
fastcgi_index index.php;
fastcgi_param SCRIPT_FILENAME $document_root$fastcgi_script_name;
include fastcgi_params;
}

6.php 配置 编辑/etc/php.ini

session.save_path = “/var/lib/php/session” 
session.auto_start = 1
​# chmod -R 777 /var/lib/php

7.设置服务开机启动

# chkconfig php-fpm on
# chkconfig mysqld on

8.启动服务

# service mysqld start
# service php-fpm start
# /usr/local/nginx/sbin/nginx
# mysqladmin -u root password ‘passwd’

9.验证nginx以及php服务

# echo “” > /usr/local/nginx/html/info.php

打开浏览器输入http://REMOTE/
打开浏览器输入http://REMOTE/info.php

10.安装phpMyAdmin 下载并解压phpMyAdmin-4.0.10.20-all-languages.tar.gz,建立到/usr/local/nginx/html/的软连接。 注意phpMyAdmin 支持的php版本。

Aside

CentOS Minimal 安装和配置TIPS

---
同步[GEJOIN.COM]
---
Linux 各种发行版虽然和Unix系非常相近,但还是有许多差别的。Linux更有趣吧.最近需要学习和测试,就在OSX平台下VirtualBox重新安装CentOS 7.由于机器本身性能原因,另外个人觉得Minimal安装不仅节约资源,而且可以更好的锻炼动手能力。再次把这次安装配置记录下来。

1.安装媒体介质是CentOS-7-x86_64-DVD-1511.iso(4.3GB.)
2.选择Minimal最小化安装。不包含KDE/GOME.
3.安装完成后进行配置,首先网络,试了ifconfig..(minimal不包含net-tools),需要自行安装,选择以CDROM(ISO)为安装源。
挂载光盘镜像:

# mkdir -p /mnt/cdrom
# mount /dev/cdrom  /mnt/cdrom

2.设置源
为了使用光盘镜像安装源,配置yum.repo:
暂时将/etc/yum.repos.d目录下文件备份,新建CentOS-Iso.repo,添加下面内容:
# vi CentOS-Iso.repo

[base]
name=iso
baseurl=file:///mnt/cdrom
gpgcheck=0

3.安装设置网络
# yum install net-tools
虚拟机设置NAT和HOST-ONLY两个网卡,配置静态IP,配置文件:
# vim /etc/sysconfig/network-scripts/ifcfgX

YPE=Ethernet
BOOTPROTO=static
IPADDR=192.168.56.100
NETMASK=255.255.255.0
NETWORK=192.168.56.0
IPV4_FAILURE_FATAL=no
NAME=enp0s3
UUID=ad60e4e1-c250-47f2-a0d2-fa1fbdbb0bd2
DEVICE=enp0s3
ONBOOT=yes

配置好后重启网络,测试内外网是否正常。
# service network restart
4.关闭防火墙,CentOS 7 不是直接设置iptables
# systemctl stop firewalld.service && sudo systemctl disable firewalld.service
5.安装一些必备的软件如wget,php等看个人需要。
6.安装pip
# wget https://bootstrap.pypa.io/get-pip.py
# python get-pip.py

7.设置时区和时间
查看当前时区 date -R
修改设置时区 tzselect
# cp /usr/share/zoneinfo/Asia/Shanghai /etc/localtime
或在profile(/etc/bashrc)添加环境变量
TZ='Asia/Shanghai'; export TZ
设置时间更新同步
# yum install -y ntpdate
# ntpdate us.pool.ntp.org
8.设置管理员sudoers
# vim /etc/sudoers 添加:

## Allow root to run any commands anywhere
root    ALL=(ALL)       ALL
gwang   ALL=(ALL)       ALL

9.其它
终端ssh连接后警告:

-bash: warning: setlocale: LC_CTYPE: cannot change locale (UTF-8): No such file or directory
[gwang@localhost ~]$ locale
locale: Cannot set LC_CTYPE to default locale: No such file or directory
locale: Cannot set LC_ALL to default locale: No such file or directory
LANG=en_US.UTF-8
LC_CTYPE=UTF-8
LC_NUMERIC="en_US.UTF-8"
LC_TIME="en_US.UTF-8"
LC_COLLATE="en_US.UTF-8"
LC_MONETARY="en_US.UTF-8"
LC_MESSAGES="en_US.UTF-8"
LC_PAPER="en_US.UTF-8"
LC_NAME="en_US.UTF-8"
LC_ADDRESS="en_US.UTF-8"
LC_TELEPHONE="en_US.UTF-8"
LC_MEASUREMENT="en_US.UTF-8"
LC_IDENTIFICATION="en_US.UTF-8"
LC_ALL=

修复:

sudo vi /etc/environment

LANG=en_US.utf-8
LC_ALL=en_US.utf-8

10.继续..

SHELL 字符串分隔然后..

SHELL 字符串分隔然后..

废话不说,直接上代码:
方案一:

divStrArry () {
    str=$@;
    OLD_IFS="$IFS"
    IFS="/"
    arr=($str)
    IFS="$OLD_IFS"
    num=${#arr[@]}
    for i in ${arr[@]}
    do
      echo $i
    done 
}

方案二:

divStrArry () {
    str="$@";
    set -A arr $(echo $str|tr '/' ' '|tr -s ' ')
    num=${#arr[@]}
    for i in ${arr[@]}
    do
      echo "$i"
    done
}

那么有一个需求:使用shell脚本FTP 建立多级目录:包括子目录。不支持mkdir -p的。
同样直接上代码

funnc() {
    local r
    local a
    r="$@"
    while [[ "$r" != "$a" ]] ; do
        a=${r%%/*}
        echo "mkdir $a"
        echo "cd $a"
        r=${r#*/}
    done
}
ftp -inv 0.0.0.0 < < EOF
user username pass
bin
$(funnc Misc/Sub/acct/${host_date})
mput xw.TXT
bye
EOF

其它废话也不说了...

Ubuntu 卸载Fcitx输入法后无法登录桌面问题解决

Ubuntu 卸载Fcitx输入法后无法登录桌面问题解决

ubuntu linux 安装搜狗拼音输入法的方法就不说了,需要依赖Fcitx。
如果想卸载fcitx和sogou拼音输入法,那么注意了,你可能回无法进入桌面系统,
具体症状是:在图形登录界面输入密码后enter,又跳回登录界面。使用CTRL+ALT+F1.正常登录,显然密码没有问题。

logo-ubuntu
原因即是:卸载不完全,导致在登录时无法正确加载输入法,准确地说是搜狗拼音输入法的残留。
解决方法:
1.切换到字符终端界面CTRL+ALT+F1..6.
2.删除/etc/X11/Xsession.d目录下的Sogou拼音配置文件。
(这块我把具体名字忘记另外,大家可以搜索grep -nr fcitx 找找)

cd /etc/X11/Xsession.d
sudo rm -f 55Sogou*[具体名字我没记下来]
cd /etc/X11/xinit/xinput.d
sudo rm -f *Sogou*[具体名字我没记下来]
sudo rm -f /usr/bin/fcitx [如果该文件存在]

3.重新登录,看是不是已经OK。

空间不够来折腾:手机系统备份到电脑

空间不够来折腾:手机系统备份到电脑

一台手机MOTO G ,8G,装了N多App,剩余空间1G左右。motorola被联想收购后,说好的lollipop迟迟不见,CM12都出了,花儿也谢了,现在要在Moto G上安装CM 12 的android5.0,背景交代完毕。
需要备份原有官方系统以待OTA,使用CWM recovery,但是剩下空间显然不够了..
解决方案:将备份文件移出手机,待需要还原时再移回手机。

1.刷入使用第三方Recovery Clockworkmod;
2.手机上进入recovery模式,备份系统;
3.挂载/data
4.敲入命令, 进入 shell界面
adb shell

5.进入目录 ,检查CWM的备份文件

/data/media/clockworkmod/backup

该目录下是备份的文件: 如:1970-02-02.16.18.37
cwm_backup

6.将文件下载到电脑,如D盘。
adb pull /data/media/clockworkmod/backup/1970-02-02.16.18.37 D:

7.需要还原时再 adb push...

--------另外刚刚有调整了Linux 下VitrulBox 虚拟机磁盘空间,也顺便写下来,类似命令:
查看硬盘信息:

VBoxManage list hdds

如果是vmdk格式虚拟机磁盘,首先将vmdk 虚拟机磁盘格式转换为vdi,因为vmdk不可以..

VBoxManage clonehd  ././XXXX.vmdk  ././XXXX.vdi  --format vdi

然后,调整改磁盘(记下UUID)大小:

VBoxManage modifyhd  UUID --resize 409600


CentOS+Ubuntu+Windows 多系统Grub引导修复

CentOS+Ubuntu+Windows 多系统Grub引导修复

简单描述状况:
1.系统安装有64位的windows 7和64位的CentOS操作系统,使用Legacy BIOS 安装引导启动,没有使用UEFI。
2.CentOS6.5 grub引导菜单正常引导WINDOWS 7+CENTOS,CentOS包含/boot分区,/分区以及/home分区
3.安装ubuntu 14.04(64位) 之后,使用alongside windows空闲分区。安装完成后使用ubuntu grub 引导启动,只能引导windows 7+ubuntu,centos 无法启动.
4.在ubuntu系统下,安装grub2/grub 然后 update-grub 均无法正常搜索到centos 。
centos-debian-ubuntu
综上,只能找其他方法,有人说用centos安装盘 grub rescue ,觉得麻烦,想用ubuntu 引导。这是我的ubuntu下/boot/grub/grub.cfg ,在其中添加Centos 分区信息,一定注意分区和UUID。 成功引导3个系统!

menuentry 'CentOS6.5, with Linux 2.6.32-431.el6.x86_64' {
    insmod gzio
    insmod part_msdos
    insmod ext2
    set root='hd0,7'
    if [ x$feature_platform_search_hint = xy ]; then
    search --no-floppy --fs-uuid --set=root --hint-bios=hd0,msdos7 --hint-efi=hd0,msdos7 --hint-baremetal=ahci0,msdos7 e30284d7-5cf6-4864-a875-75012d8d9b14
   else
   search --no-floppy --fs-uuid --set=e30284d7-5cf6-4864-a875-75012d8d9b14
   fi
    echo 'Loading Linux 2.6.32-431.el6.x86_64 ...'
    linux /boot/vmlinuz-2.6.32-431.el6.x86_64 root=UUID=e30284d7-5cf6-4864-a875-75012d8d9b14 ro quiet splash
    echo 'Loading initial ramdisk ...'
    initrd /boot/initramfs-2.6.32-431.el6.x86_64.img
}

这里再提一下,在已安装windows 的gpt(mbr)的 磁盘下安装ubuntu 时 ,如果无法看到windows分区,而是一整块硬盘,那么使用liveCD进入系统,使用下面命令修复:

sudo dd if=/dev/zero of=/dev/sda bs=1 count=8 seek=512


Centos6.5 WIFI无线网卡BCM43142驱动安装

Centos6.5 WIFI无线网卡BCM43142驱动安装

设备型号:DELL V2420

Broadcom 网卡型号:BCM43142

lspci|grep Broadcom

07:00.0 Network controller: Broadcom Corporation BCM43142 802.11b/g/n (rev 01)

centos_logo

1.确定自己的网卡驱动

https://lug.ustc.edu.cn/sites/opensuse-guide/wlan.php

http://www.broadcom.com/support/802.11/linux_sta.php

下载网卡驱动:hybrid-v35_64-nodebug-pcoem-6_30_223_141.tar.gz

2.解压编译网卡驱动:

解压出目录lib srcMakefile文件,执行:

make

这样会编译报错:

/home/xxx/packages/driver/src/wl/sys/wl_cfg80211_hybrid.c:2122: error: too few arguments to function ‘cfg80211_roamed’

make[2]: *** [/home/xxx/packages/driver/src/wl/sys/wl_cfg80211_hybrid.o] Error 1

make[1]: *** [_module_/home/xxx/packages/driver] Error 2

make[1]: Leaving directory `/usr/src/kernels/2.6.32-431.el6.x86_64'

make: *** [all] Error 2

注意:添加编译参数 make API=WEXT

OK!

make API=WEXT

CC /home/xxx/packages/driver/wl.mod.o

LD [M] /home/xxx/packages/driver/wl.ko.unsigned

NO SIGN [M] /home/xxx/packages/driver/wl.ko

make[1]: Leaving directory `/usr/src/kernels/2.6.32-431.el6.x86_64'

3.安装

# make install

install -D -m 755 wl.ko /lib/modules/`uname -r`/kernel/drivers/net/wireless

4.加载新的驱动程序

# modprobe lib80211

# insmod wl.ko

5.重新启动网络服务

# service network restart

Shutting down interface p5p1: Device state: 3 (disconnected)

[ OK ]

Shutting down loopback interface: [ OK ]

Bringing up loopback interface: [ OK ]

参考来源,从这里看到编译参数,谢谢!:http://weiruoyu.blog.51cto.com/951650/1193257

Ubuntu/Mint Linux无线网络WIFI 启用

Ubuntu/Mint Linux无线网络WIFI 启用

Ubuntu/Mint Linux 安装好通常可以直接连接到网络,但有的设备可能连接WIFI是出现问题。在Desktop环境下根本看不到无线连接图标和选项,简单几步,试试能不能解决:

1.Mint/Ubuntu 12下首先需要连接一个有线网络,安装无线网卡驱动;在桌面环境下,进入菜单---系统(偏好)设置---系统中的“驱动管理”(Driver Manager),看到下面界面:

driver

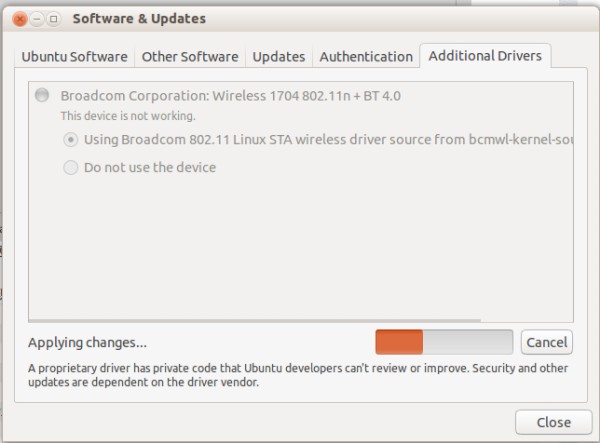
ubuntu 13 .10 在软件更新界面里:

abc_ubuntu

选择设备驱动,应用更改,将自动安装该驱动。

2.安装完成后,会发现,无线WIFI网络出现在菜单中,但是是灰体显示 WIFI disabled,无法更改:

~ $ iwconfig
vmnet8    no wireless extensions.
eth0      no wireless extensions.
eth1      IEEE 802.11abg  ESSID:off/any
Mode:Managed  Access Point: Not-Associated
Retry  long limit:7   RTS thr:off   Fragment thr:off
Power Management:off

发现已经出现了eth1这个无线网卡,只是Network is down。

3.重启网络管理程序,sudo service network-manager restart 即可应用更改,无线网络可以搜索连接。

~ $ sudo service network-manager restart
network-manager stop/waiting
network-manager start/running, process 30359

VMware 中Linux 调整分区大小

VMware 中Linux 调整分区大小

Fedora_logo

Precondition :VMware Player 中安装的Fedora 17 Linux 32bit,个人较久远的测试环境,安装时没有进行磁盘规划,默认20G空间(动态调整),安装在根/下。
Background :在上述环境中安装IBM DB2 Express-C 10.5(v10.5fp1_linuxia32_expc.tar.gz),安装时/tmp空间不足,无法安装。
Plan:需要进行磁盘扩容。考虑到使用VMware Player虚拟机。

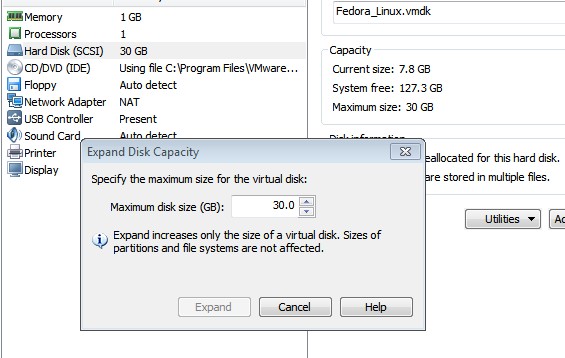
1.首先调整虚拟机大小:player_vm_fedora

2.虚拟机开机,使用fdisk 命令新建新区 fdisk  /dev/sda 添加 /dev/sda3

3.接下来就贴代码了:

Fedora release 17 (Beefy Miracle)
Kernel 3.4.0-1.fc17.i686 on an i686 (0)

[root@localhost ~]# df -h
Filesystem Size Used Avail Use% Mounted on
rootfs 6.5G 6.0G 529M 92% /
devtmpfs 494M 0 494M 0% /dev
tmpfs 502M 0 502M 0% /dev/shm
tmpfs 502M 940K 502M 1% /run
/dev/mapper/vg-lv_root 6.5G 6.0G 529M 92% /
tmpfs 502M 0 502M 0% /sys/fs/cgroup
tmpfs 502M 0 502M 0% /media
/dev/sda1 497M 81M 392M 17% /boot

[root@localhost ~]# # fdisk /dev/sda

[root@localhost ~]# fdisk -l

Disk /dev/sda: 32.2 GB, 32212254720 bytes
255 heads, 63 sectors/track, 3916 cylinders, total 62914560 sectors
Units = sectors of 1 * 512 = 512 bytes
Sector size (logical/physical): 512 bytes / 512 bytes
I/O size (minimum/optimal): 512 bytes / 512 bytes
Disk identifier: 0x00002255

Device Boot Start End Blocks Id System
/dev/sda1 * 2048 1026047 512000 83 Linux
/dev/sda2 1026048 16777215 7875584 8e Linux LVM
/dev/sda3 16777216 62914559 23068672 83 Linux

Disk /dev/mapper/vg-lv_swap: 1073 MB, 1073741824 bytes
255 heads, 63 sectors/track, 130 cylinders, total 2097152 sectors
Units = sectors of 1 * 512 = 512 bytes
Sector size (logical/physical): 512 bytes / 512 bytes
I/O size (minimum/optimal): 512 bytes / 512 bytes

Disk /dev/mapper/vg-lv_root: 6979 MB, 6979321856 bytes
255 heads, 63 sectors/track, 848 cylinders, total 13631488 sectors
Units = sectors of 1 * 512 = 512 bytes
Sector size (logical/physical): 512 bytes / 512 bytes
I/O size (minimum/optimal): 512 bytes / 512 bytes

[root@localhost ~]# pvcreate /dev/sda3
Writing physical volume data to disk "/dev/sda3"
Physical volume "/dev/sda3" successfully created

[root@localhost ~]# vgextend /dev/mapper/vg /dev/sda3 
Volume group "vg" successfully extended
[root@localhost ~]# lvextend -L +20G /dev/mapper/vg-lv_root
Extending logical volume lv_root to 26.50 GiB
Logical volume lv_root successfully resized

[root@localhost ~]# resize2fs /dev/mapper/vg-lv_root 
resize2fs 1.42 (29-Nov-2011)
Filesystem at /dev/mapper/vg-lv_root is mounted on /; on-line resizing required
old_desc_blocks = 1, new_desc_blocks = 2
The filesystem on /dev/mapper/vg-lv_root is now 6946816 blocks long.

[root@localhost ~]# df -h
Filesystem Size Used Avail Use% Mounted on
rootfs 27G 6.2G 21G 24% /
devtmpfs 494M 0 494M 0% /dev
tmpfs 502M 0 502M 0% /dev/shm
tmpfs 502M 956K 502M 1% /run
/dev/mapper/vg-lv_root 27G 6.2G 21G 24% /
tmpfs 502M 0 502M 0% /sys/fs/cgroup
tmpfs 502M 0 502M 0% /media
/dev/sda1 497M 81M 392M 17% /boot
[root@localhost ~]#

至此,操作结束,空间调整为30GB,满足使用需求。当然,此方案针对虚拟机中已安装的没有采用LVM的linux分区大小调整,其它不必参考此方案。

可恶的乱码!:pluma和gedit汉字乱码解决

可恶的乱码!:pluma和gedit汉字乱码解决

一个破设备:Dell V2420,2G内存预装32位Windows 7.卡得不能用。于是升级内存4G,更换x64位windows 7操作系统。可恶的UEFIGPT各种不好装这里就不唠叨了总之比较不爽,还好win 7 x64装好了;接下来装个ubuntu 12.04 做为自己日常开发测试环境。问题来了,又是装不了,32位无法启动引导,64位安装中要么Time out..要么fata error..实在搞不定,换了Linux Mint 16 Mate 64位,毫无压力的装好了……好蛋疼……

配置好dev环境,安装VMware player...一切OK。不急,问题又来了。可恶的乱码!

由于Linux mint Mate 16 默认的是Pluma文本编辑器,中文显示乱码,goolge之,说的挺好,但没有解决问题,通过探索,下为解决方案:

Linux Mint中Pluma:

1. 安装dconf-tools :

sudo apt-get install dconf-tools

2. 配置pluma. 打开系统Menu--System Tools--dconf Editor. 在工具菜单中展开 org---mate---pluma 。将auto-detected-encodings 修改为:

['GB2312', 'UTF-8', 'CURRENT', 'ISO-8859-15', 'UTF-16', 'GBK', 'GB18030'],

Warnning:将GB2312 或者GBK 放在最前,否则依然无效..

重新 打开中文的文件,看是否OK。

mate

Ubuntu中gedit:

方法同上,

1. 安装dconf-tools :

sudo apt-get install dconf-tools

2. 搜索dconf Editor. 在工具菜单中展开 org---gnome---gedit--preferences 中的Encodings中auto-detected-encodings 修改为:

['GB2312', 'UTF-8', 'CURRENT', 'ISO-8859-15', 'UTF-16', 'GBK', 'GB18030'],

ff_ins