
![]()
Precondition :VMware Player 中安装的Fedora 17 Linux 32bit,个人较久远的测试环境,安装时没有进行磁盘规划,默认20G空间(动态调整),安装在根/下。
Background :在上述环境中安装IBM DB2 Express-C 10.5(v10.5fp1_linuxia32_expc.tar.gz),安装时/tmp空间不足,无法安装。
Plan:需要进行磁盘扩容。考虑到使用VMware Player虚拟机。
1.首先调整虚拟机大小: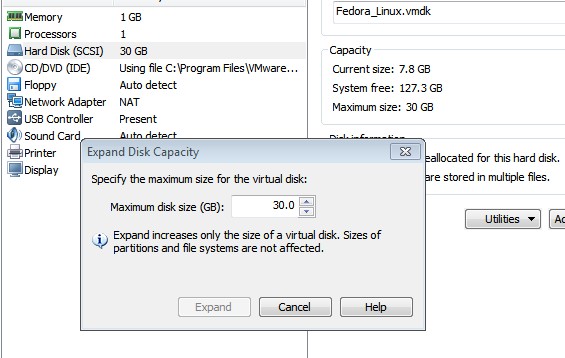
2.虚拟机开机,使用fdisk 命令新建新区 fdisk /dev/sda 添加 /dev/sda3
3.接下来就贴代码了:
Fedora release 17 (Beefy Miracle)
Kernel 3.4.0-1.fc17.i686 on an i686 (0)

[root@localhost ~]# df -h
Filesystem Size Used Avail Use% Mounted on
rootfs 6.5G 6.0G 529M 92% /
devtmpfs 494M 0 494M 0% /dev
tmpfs 502M 0 502M 0% /dev/shm
tmpfs 502M 940K 502M 1% /run
/dev/mapper/vg-lv_root 6.5G 6.0G 529M 92% /
tmpfs 502M 0 502M 0% /sys/fs/cgroup
tmpfs 502M 0 502M 0% /media
/dev/sda1 497M 81M 392M 17% /boot

[root@localhost ~]# # fdisk /dev/sda

[root@localhost ~]# fdisk -l

Disk /dev/sda: 32.2 GB, 32212254720 bytes
255 heads, 63 sectors/track, 3916 cylinders, total 62914560 sectors
Units = sectors of 1 * 512 = 512 bytes
Sector size (logical/physical): 512 bytes / 512 bytes
I/O size (minimum/optimal): 512 bytes / 512 bytes
Disk identifier: 0x00002255

Device Boot Start End Blocks Id System
/dev/sda1 * 2048 1026047 512000 83 Linux
/dev/sda2 1026048 16777215 7875584 8e Linux LVM
/dev/sda3 16777216 62914559 23068672 83 Linux

Disk /dev/mapper/vg-lv_swap: 1073 MB, 1073741824 bytes
255 heads, 63 sectors/track, 130 cylinders, total 2097152 sectors
Units = sectors of 1 * 512 = 512 bytes
Sector size (logical/physical): 512 bytes / 512 bytes
I/O size (minimum/optimal): 512 bytes / 512 bytes

Disk /dev/mapper/vg-lv_root: 6979 MB, 6979321856 bytes
255 heads, 63 sectors/track, 848 cylinders, total 13631488 sectors
Units = sectors of 1 * 512 = 512 bytes
Sector size (logical/physical): 512 bytes / 512 bytes
I/O size (minimum/optimal): 512 bytes / 512 bytes

[root@localhost ~]# pvcreate /dev/sda3
Writing physical volume data to disk "/dev/sda3"
Physical volume "/dev/sda3" successfully created

[root@localhost ~]# vgextend /dev/mapper/vg /dev/sda3
Volume group "vg" successfully extended
[root@localhost ~]# lvextend -L +20G /dev/mapper/vg-lv_root
Extending logical volume lv_root to 26.50 GiB
Logical volume lv_root successfully resized

[root@localhost ~]# resize2fs /dev/mapper/vg-lv_root
resize2fs 1.42 (29-Nov-2011)
Filesystem at /dev/mapper/vg-lv_root is mounted on /; on-line resizing required
old_desc_blocks = 1, new_desc_blocks = 2
The filesystem on /dev/mapper/vg-lv_root is now 6946816 blocks long.

[root@localhost ~]# df -h
Filesystem Size Used Avail Use% Mounted on
rootfs 27G 6.2G 21G 24% /
devtmpfs 494M 0 494M 0% /dev
tmpfs 502M 0 502M 0% /dev/shm
tmpfs 502M 956K 502M 1% /run
/dev/mapper/vg-lv_root 27G 6.2G 21G 24% /
tmpfs 502M 0 502M 0% /sys/fs/cgroup
tmpfs 502M 0 502M 0% /media
/dev/sda1 497M 81M 392M 17% /boot
[root@localhost ~]#
至此,操作结束,空间调整为30GB,满足使用需求。当然,此方案针对虚拟机中已安装的没有采用LVM的linux分区大小调整,其它不必参考此方案。
